
- Posts: 489
- Thank you received: 0

ACMOC Membership Benefits
- FREE quarterly magazine filled with content about antique Caterpillar machines
- FREE classified listings
- ACMOC store discounts and specials
- Full Bulletin Board Access
- Marketplace (For Sale/Wanted)
- Technical Library
- Post attachments
$44 /year ELECTRONIC
$60 /year USA
$77 /year International
Mounting a military winch on my 22
7 years 5 months ago #154586
by Gregness
Replied by Gregness on topic Mounting a military winch on my 22
Dan, I think I have a winch just like the one you are working with. My grandpa had it kinda jury-rigged onto the back of the family D24U that I now own, using a hydraulic motor to drive it. Right now I am trying to score a dead D2 3J with a Holt winch on it over in Shelton, but if that falls through I may try to do something like you are doing. I have a PTO unit for my D2. You are just down the road in Battleground so I may have to come check out your lash-up!
Greg
Greg
Please Log in or Create an account to join the conversation.
7 years 5 months ago #154613
by Dan Pratt
Dan22 - 1936 22 Narrow, 1937 22 Wide, D2 5J, D4D
Replied by Dan Pratt on topic Mounting a military winch on my 22
Sure Greg, you can come over.
Let me get it further along and we will set it up.
Let me get it further along and we will set it up.
Dan22 - 1936 22 Narrow, 1937 22 Wide, D2 5J, D4D
Please Log in or Create an account to join the conversation.
7 years 5 months ago #154849
by Dan Pratt
Dan22 - 1936 22 Narrow, 1937 22 Wide, D2 5J, D4D
Replied by Dan Pratt on topic Brake cable
Had a custom cable made by CableCraft in Portland. Clevis at the brake end, and an eye at the lever end. Some mods were necessary to weld a coupling nut to the clevis, and to narrow up the eye to fit the gap in the handle.


Fabbed up a mounting bracket for the brake end and positioned it just under the cover. Slot is for the cable to fit through. Then I cut the slot for the cover. Finished on that end!


Next was the bracket for the lever end. Another treasure from my miscellaneous bracket inventory. It had a hole near the right place too.

Lastly, this is the handle I will use for the free spool clutch release at the operator station. I will have to bend it to a Z shape a bit to fit the path I have in mind for it.

I think I am ready to bring the tractor into the shop to test fit everthing up.
Fabbed up a mounting bracket for the brake end and positioned it just under the cover. Slot is for the cable to fit through. Then I cut the slot for the cover. Finished on that end!
Next was the bracket for the lever end. Another treasure from my miscellaneous bracket inventory. It had a hole near the right place too.
Lastly, this is the handle I will use for the free spool clutch release at the operator station. I will have to bend it to a Z shape a bit to fit the path I have in mind for it.
I think I am ready to bring the tractor into the shop to test fit everthing up.
Dan22 - 1936 22 Narrow, 1937 22 Wide, D2 5J, D4D
Please Log in or Create an account to join the conversation.
7 years 5 months ago #154965
by Dan Pratt
Dan22 - 1936 22 Narrow, 1937 22 Wide, D2 5J, D4D
Replied by Dan Pratt on topic So far, it fits!
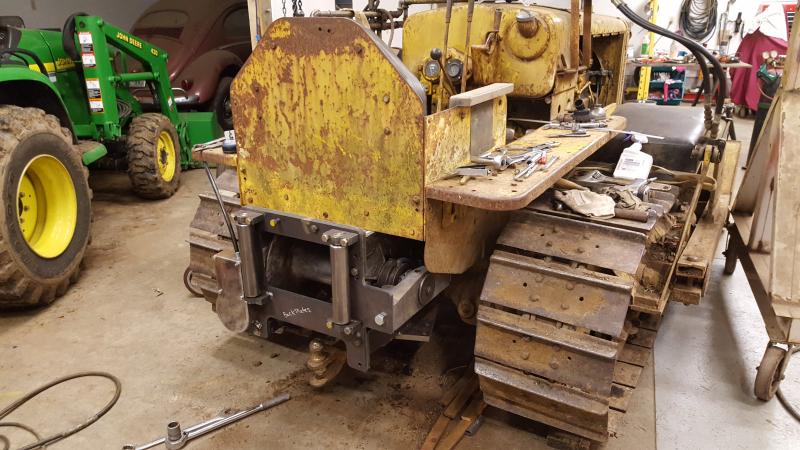
Got the seat off, and drawbar brackets removed. Studs are re-set and surface is cleaned.


Unit slipped right in place. Tightest clearance is shown on the left fender tail, and it is perfect. Chain slack is at about 3/4" so the tensioner will take that up nicely.


Here is where I will fab up a bracket that mounts to the final drive flange. I will cut the head off this bolt, then weld it to the bracket plate. I will use the top 3 1/2" bolts which are all in a straight line.

Unit slipped right in place. Tightest clearance is shown on the left fender tail, and it is perfect. Chain slack is at about 3/4" so the tensioner will take that up nicely.
Here is where I will fab up a bracket that mounts to the final drive flange. I will cut the head off this bolt, then weld it to the bracket plate. I will use the top 3 1/2" bolts which are all in a straight line.
Dan22 - 1936 22 Narrow, 1937 22 Wide, D2 5J, D4D
Please Log in or Create an account to join the conversation.
7 years 5 months ago #154976
by Gregness
Replied by Gregness on topic Mounting a military winch on my 22
Looking really good Dan!
Please Log in or Create an account to join the conversation.
7 years 5 months ago #155341
by Dan Pratt
Dan22 - 1936 22 Narrow, 1937 22 Wide, D2 5J, D4D
Replied by Dan Pratt on topic Upper mounts complete
Some good progress this weekend on the upper mounts. Hardest part was figuring out the bolt spacing on the final drive flange. I used a piece of gasket material and held it in place while making an impression of the holes with the round knob on top of a Craftsman screwdriver. Got the pattern close enough to figure out the offset of the three holes. Then to get the bolt spacing, I threaded the bolts into the holes so they stuck out, then micrometered the outside dimension, minus the diameter of one bolt. I think I got it to within .010" for hole placement as a guess.
Then transferred the center of the holes via a center punch to the metal, confirmed the spacing, then drilled the pilot holes. First test and the bolts fit but a bit snug. Some filing with a round file brought them close. I did not want large holes in an effort to try to get even shear load on each bolt.


I have a 1/2" offset bend to the bolts so they line up with the center of the plate. Tacked them up and all is good. Removed the bracket for the final weld, then tested the fit under tension. Seems to work nice.
Now I am working on the release lever.
Then transferred the center of the holes via a center punch to the metal, confirmed the spacing, then drilled the pilot holes. First test and the bolts fit but a bit snug. Some filing with a round file brought them close. I did not want large holes in an effort to try to get even shear load on each bolt.
I have a 1/2" offset bend to the bolts so they line up with the center of the plate. Tacked them up and all is good. Removed the bracket for the final weld, then tested the fit under tension. Seems to work nice.
Now I am working on the release lever.
Dan22 - 1936 22 Narrow, 1937 22 Wide, D2 5J, D4D
Please Log in or Create an account to join the conversation.
7 years 5 months ago #155344
by neil
Cheers,
Neil
Pittsford, NY
Replied by neil on topic Mounting a military winch on my 22
010? Scrap it and try again! Just joking, that's excellent work Dan, I'm very much enjoying watching this project. Can't wait for the video : )
Cheers,
Neil
Pittsford, NY
Please Log in or Create an account to join the conversation.
7 years 5 months ago #155444
by Dan Pratt
Dan22 - 1936 22 Narrow, 1937 22 Wide, D2 5J, D4D
010 was just a guess as I have no real way to measure. Could be 020???? Hey the bolts went in with only minor tweaking of the holes. I am happy how it turned out.
Glad you like the project. I will have to try to get a video of the action on the running machine.
Glad you like the project. I will have to try to get a video of the action on the running machine.
Dan22 - 1936 22 Narrow, 1937 22 Wide, D2 5J, D4D
Please Log in or Create an account to join the conversation.
7 years 5 months ago #155722
by Dan Pratt
Dan22 - 1936 22 Narrow, 1937 22 Wide, D2 5J, D4D
Replied by Dan Pratt on topic Clutch release lever working
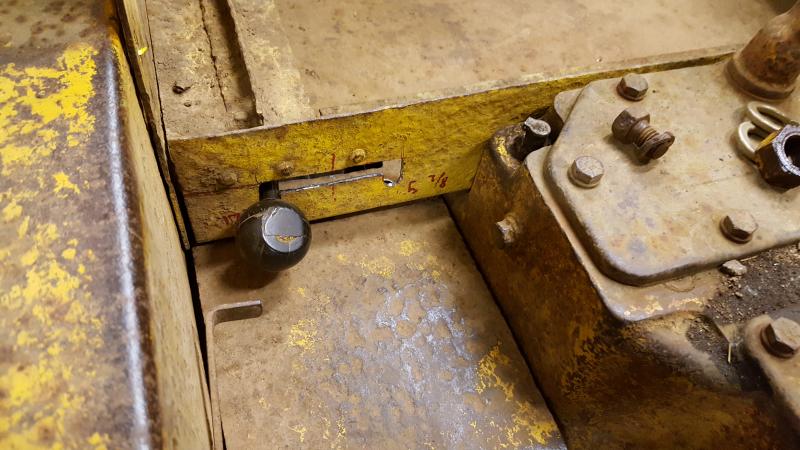
Having some fun adapting the original (and broken) free spool release clutch handle to my new route through the seat box. The original lever had a spring loaded knob that would drop a pin into a hole at each position. That hole would lock it in place either fully engaged, or in the free spool mode, which also pressed a brake pad against the drum. The brake pad is pushed by a plunger spring, and if the release is not latched, it would push back mid stroke. My solution is to use a slotted hole with notches at the new handle end. Just pop it up and over and down to change clutch position.
Here is the repair to the old release lever. Cast iron part was broken years ago, then someone tried welding it with steel rod. Not working. I ground off the old crud weld, then used the right nickel rod to fix er up.
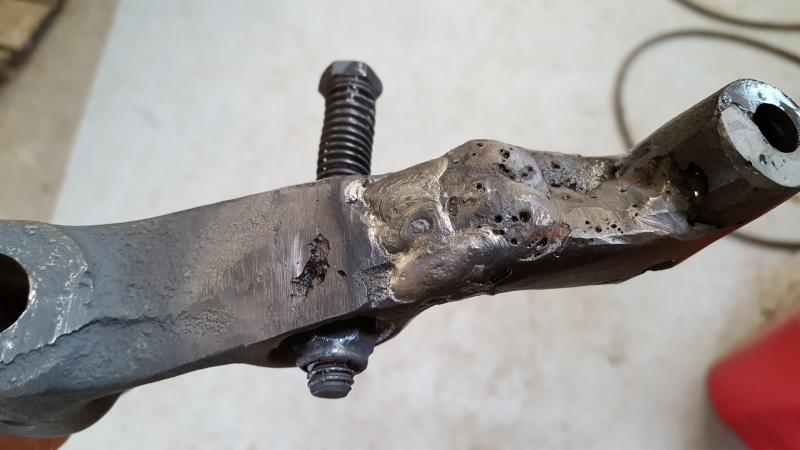
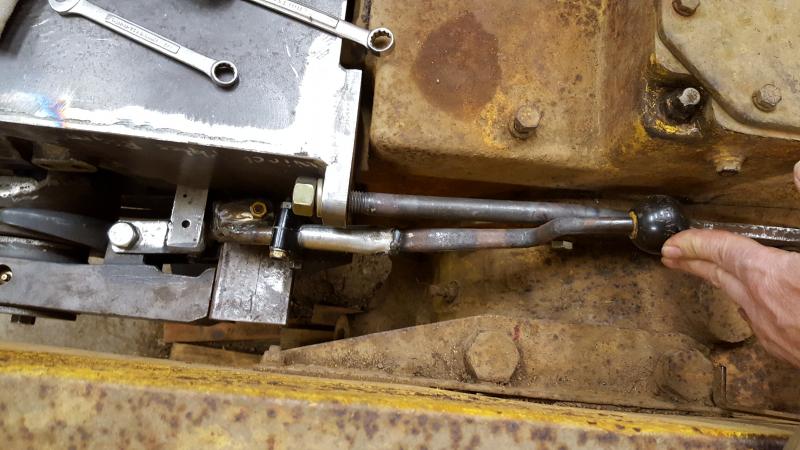
Once the lever was repaired and stable, I fabbed (cobbled!) up a cap to wrap the lever and use the only one bolt hole to hold it on. The cap wraps over the lever to make at tight grip. The old lever has now been bent into a jogged shape, and an extension added made of conduit. Then the conduit is slotted to fit and clamp over a 3/4" bar stock, in turn welded to the cap. Make sense, right? The clamp allows me to adjust the length and twist of the handle position once it is in place. The clamps are a couple of old motorcycle handlebar clamps I had sitting around. Finally found the perfect use for them. The whole throw of the handle just fits between the winch mount and the big fender bracket mount with about 1/8" to spare on each side. Needless to say, it took several iterations of tack and fit then break it apart, and do it again.
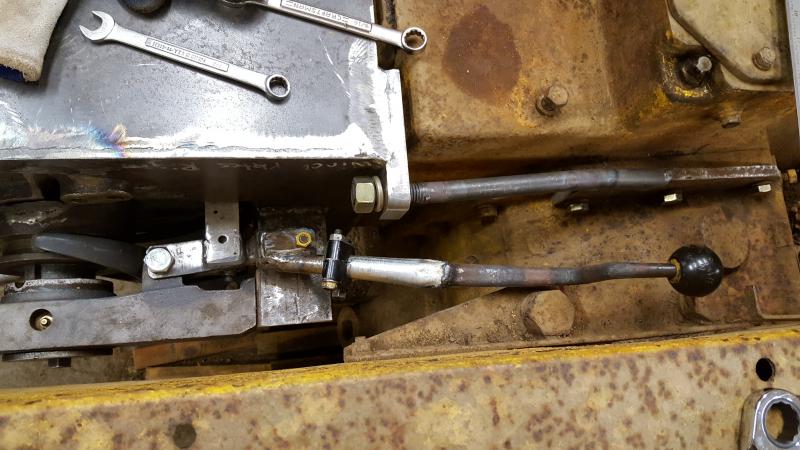
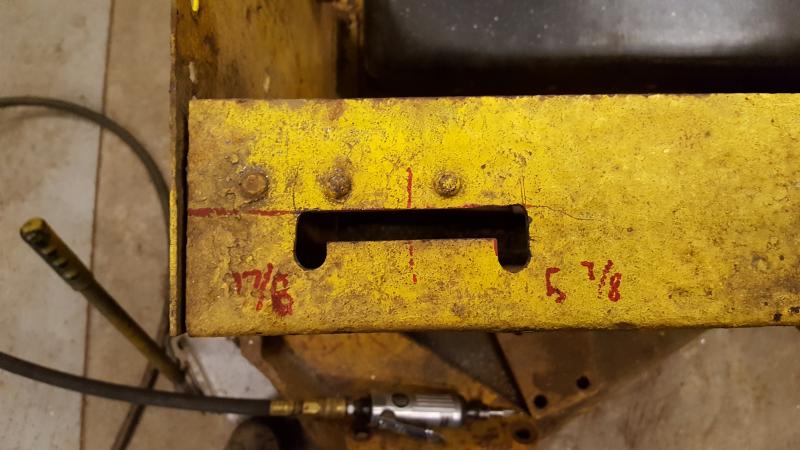
Then I cut the seat box slots based on the now confirmed travel of the handle knob, and position. Slot underneath has a radius of curvature based on the pivot point. Slop in the lever lets it move up and down nicely.
Here are both positions and inside the seat box. I do not believe the knob will be in the way of my heel on the floor plate, but it is easily reachable.

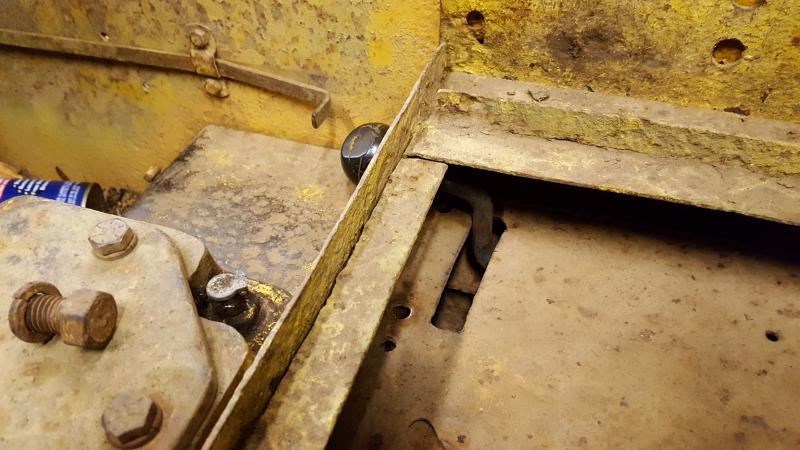
A view with the seat in place.
Here is the repair to the old release lever. Cast iron part was broken years ago, then someone tried welding it with steel rod. Not working. I ground off the old crud weld, then used the right nickel rod to fix er up.
Once the lever was repaired and stable, I fabbed (cobbled!) up a cap to wrap the lever and use the only one bolt hole to hold it on. The cap wraps over the lever to make at tight grip. The old lever has now been bent into a jogged shape, and an extension added made of conduit. Then the conduit is slotted to fit and clamp over a 3/4" bar stock, in turn welded to the cap. Make sense, right? The clamp allows me to adjust the length and twist of the handle position once it is in place. The clamps are a couple of old motorcycle handlebar clamps I had sitting around. Finally found the perfect use for them. The whole throw of the handle just fits between the winch mount and the big fender bracket mount with about 1/8" to spare on each side. Needless to say, it took several iterations of tack and fit then break it apart, and do it again.
Then I cut the seat box slots based on the now confirmed travel of the handle knob, and position. Slot underneath has a radius of curvature based on the pivot point. Slop in the lever lets it move up and down nicely.
Here are both positions and inside the seat box. I do not believe the knob will be in the way of my heel on the floor plate, but it is easily reachable.
A view with the seat in place.
Dan22 - 1936 22 Narrow, 1937 22 Wide, D2 5J, D4D
Please Log in or Create an account to join the conversation.
Time to create page: 0.393 seconds
ACMOC
Antique Caterpillar Machinery Owners Club
1115 Madison St NE # 1117
Salem, OR 97301
cat@acmoc.org
Become a Member!
"I became a member recently because the wealth of knowledge here is priceless."
- Chris R
"I also joined a year ago. had been on here a couple of times as a non-member and found the info very helpful so I got a one year subscription (not very expensive at all) to try it out. I really like all the resources on here so I just got a three year. I think its a very small price for what you can get out of this site."
- Jason N