- Posts: 6631
- Thank you received: 582

ACMOC Membership Benefits
- FREE quarterly magazine filled with content about antique Caterpillar machines
- FREE classified listings
- ACMOC store discounts and specials
- Full Bulletin Board Access
- Marketplace (For Sale/Wanted)
- Technical Library
- Post attachments
$44 /year ELECTRONIC
$60 /year USA
$77 /year International
- Forum
- Antique Caterpillar Machinery Owners Club
- DISCUSSION
- D4 Traxcavator - weld-on sprocket rim technique without removal
D4 Traxcavator - weld-on sprocket rim technique without removal
1 year 8 months ago #240072
by neil
Cheers,
Neil
Pittsford, NY
Replied by neil on topic D4 Traxcavator - weld-on sprocket rim technique without removal
Buddy happened to see a sign for a mobile welder, so we're tee'd up for next Sat for the guy to do the worst sprocket and we'll see how it works out. He says he can do it in a day, making up a jig to set the position of the new rim. If it all works out ok, we'll get him to do the other one, also in-situ.
Would anyone happen to know either if the HT-4 has an operator's manual, and/or what the oil change capacity is in the hydraulic system. It has a two-spool #44 on the front, and the large tank mounted atop the main engine area. I don't have the serial # for the loader yet as the tag has been scratched up. Would anyone recall what the chemical/dye is that makes the numbers appear?
Would anyone happen to know either if the HT-4 has an operator's manual, and/or what the oil change capacity is in the hydraulic system. It has a two-spool #44 on the front, and the large tank mounted atop the main engine area. I don't have the serial # for the loader yet as the tag has been scratched up. Would anyone recall what the chemical/dye is that makes the numbers appear?
Cheers,
Neil
Pittsford, NY
The following user(s) said Thank You: Fat Dan
Please Log in or Create an account to join the conversation.
- trainzkid88
-

- Offline
- Platinum Boarder
- User
Less
More
- Posts: 2029
- Thank you received: 764
1 year 8 months ago #240121
by trainzkid88
Replied by trainzkid88 on topic D4 Traxcavator - weld-on sprocket rim technique without removal
try flaw check neil also know as dye check its a 4 product system. available at any good industrial supply. you could also try a pencil rubbing on a bit of transfer paper.
The following user(s) said Thank You: Fat Dan
Please Log in or Create an account to join the conversation.
1 year 8 months ago #240344
by neil
Cheers,
Neil
Pittsford, NY
Replied by neil on topic D4 Traxcavator - weld-on sprocket rim technique without removal
Good news is the welder did the segment cutout method and it worked very well. He's within 1/8" on the out-of-round and on the side wobble. Have him teed up for the other sprocket next week. took out basically one spoke segment's worth and that was enough to slip it over the track frame boss. Also fitted all new R16 hoses so we'll prime the system next weekend. There's a procedure in the serviceman's reference that we'll follow. Figured the Trackson serial # is 35C132, on base tractor 7U18584
Cheers,
Neil
Pittsford, NY
Please Log in or Create an account to join the conversation.
1 year 8 months ago - 1 year 8 months ago #240353
by neil
Cheers,
Neil
Pittsford, NY
Replied by neil on topic D4 Traxcavator - weld-on sprocket rim technique without removal
Would anyone happen to have dimensions on the threaded bar that fits inside the track frame channels used to secure the track roller bolts? My measurements for the two extant ones on one side of the machine have the rollers spaced 11" apart, the roller bolt holes 3.5" apart, and 21.5" from the front of the bar to the first roller hole. The bar itself I make at 1.25" wide by 3/4" thick. Could someone confirm or update those measurements please so I can get a couple made up
Cheers,
Neil
Pittsford, NY
Last edit: 1 year 8 months ago by neil.
Please Log in or Create an account to join the conversation.
1 year 7 months ago #240984
by neil
Cheers,
Neil
Pittsford, NY
Replied by neil on topic D4 Traxcavator - weld-on sprocket rim technique without removal
I used 1 1/4 x 3/4 bar with 5/8-11 threaded holes spaced at 3.5 inches for the roller mounting holes, and then 7.5 from the second hole to the first of the next roller, so 11" center to center of each roller. The parts catalog specifies 0S1572 which are 2" long however we found that the bolts need to be 2.5" long so I'm not clear on why that part # was specified or whether the rollers are non-standard etc.
We slid the bars in from the rear as the loader bucket was on the ground, preventing sliding them in from the front
We slid the bars in from the rear as the loader bucket was on the ground, preventing sliding them in from the front
Cheers,
Neil
Pittsford, NY
Please Log in or Create an account to join the conversation.
1 year 6 months ago - 1 year 6 months ago #241148
by neil
Cheers,
Neil
Pittsford, NY
Replied by neil on topic D4 Traxcavator - weld-on sprocket rim technique without removal
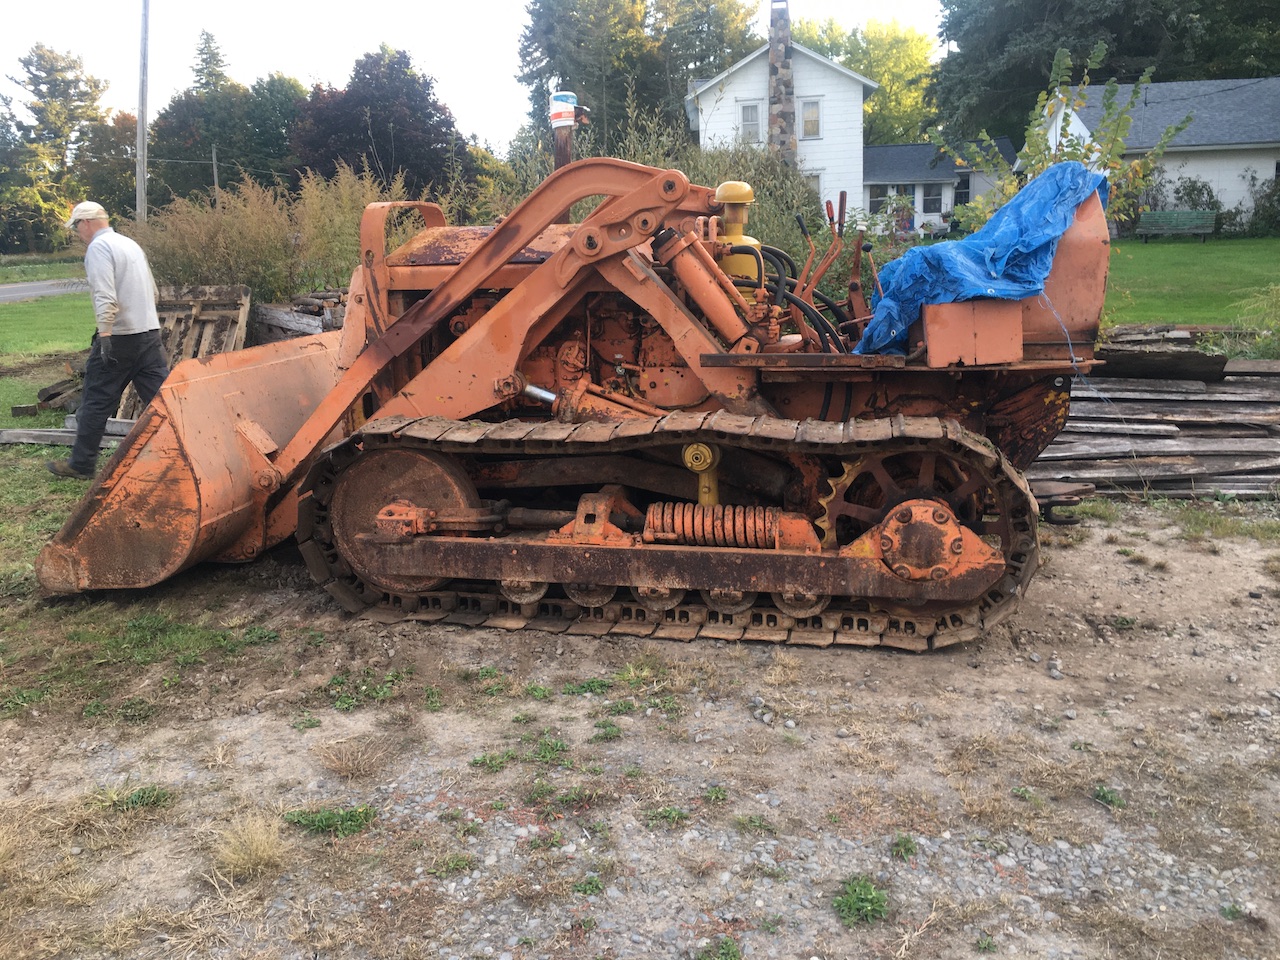
We mounted the right side rollers obtained from reisingerweld (along with the tracks and carrier rollers). Some of the rollers had a different design resulting in different bolt length required. We needed 2 1/2" bolts and 3" bolts to have proper thread engagement in the threaded bar. The longer bolts were needed for the rollers that look like originals, with the button head grease nipple. The bolts from the parts catalog are 2" and those were inadequate, so I'm not sure what our situation was. Anyway, we torqued them all up and fitted the tracks and drove the Traxcavator around so we could adjust the tracks up nicely. Weld-on sprocket rims worked out well, with cutting out about a 30 degree segment and fitting them on to the spokes, avoiding having to remove the track frames, which is a bit of an operation on a Traxcavator. Very happy with the result.
Cheers,
Neil
Pittsford, NY
Attachments:
Last edit: 1 year 6 months ago by neil.
The following user(s) said Thank You: kracked1
Please Log in or Create an account to join the conversation.
- Forum
- Antique Caterpillar Machinery Owners Club
- DISCUSSION
- D4 Traxcavator - weld-on sprocket rim technique without removal
Time to create page: 0.172 seconds
ACMOC
Antique Caterpillar Machinery Owners Club
1115 Madison St NE # 1117
Salem, OR 97301
cat@acmoc.org
Become a Member!
"I became a member recently because the wealth of knowledge here is priceless."
- Chris R
"I also joined a year ago. had been on here a couple of times as a non-member and found the info very helpful so I got a one year subscription (not very expensive at all) to try it out. I really like all the resources on here so I just got a three year. I think its a very small price for what you can get out of this site."
- Jason N