Advanced Search

Search Results (Searched for: cast iron welding)

12 Dec 2016 13:16

Mounting a military winch on my 22

Category: DISCUSSION

Having some fun adapting the original (and broken) free spool release clutch handle to my new route through the seat box. The original lever had a spring loaded knob that would drop a pin into a hole at each position. That hole would lock it in place either fully engaged, or in the free spool mode, which also pressed a brake pad against the drum. The brake pad is pushed by a plunger spring, and if the release is not latched, it would push back mid stroke. My solution is to use a slotted hole with notches at the new handle end. Just pop it up and over and down to change clutch position.

Here is the repair to the old release lever. Cast iron part was broken years ago, then someone tried welding it with steel rod. Not working. I ground off the old crud weld, then used the right nickel rod to fix er up.


Once the lever was repaired and stable, I fabbed (cobbled!) up a cap to wrap the lever and use the only one bolt hole to hold it on. The cap wraps over the lever to make at tight grip. The old lever has now been bent into a jogged shape, and an extension added made of conduit. Then the conduit is slotted to fit and clamp over a 3/4" bar stock, in turn welded to the cap. Make sense, right? The clamp allows me to adjust the length and twist of the handle position once it is in place. The clamps are a couple of old motorcycle handlebar clamps I had sitting around. Finally found the perfect use for them. The whole throw of the handle just fits between the winch mount and the big fender bracket mount with about 1/8" to spare on each side. Needless to say, it took several iterations of tack and fit then break it apart, and do it again.


Then I cut the seat box slots based on the now confirmed travel of the handle knob, and position. Slot underneath has a radius of curvature based on the pivot point. Slop in the lever lets it move up and down nicely.


Here are both positions and inside the seat box. I do not believe the knob will be in the way of my heel on the floor plate, but it is easily reachable.


A view with the seat in place.

21 Oct 2016 17:23

Mounting a military winch on my 22

Category: DISCUSSION

Picked up the plates from the metal supplier yesterday. All is looking good except the side plates with the bigger cuts ended up a little warped. I think I can easily straighten them with a sledge hammer.


I added a couple of shots of the rebuilt winch. Cleaned and ready for primer. I am going to prime it before welding up the mount so the spatter is less likely to stick to the bare metal. One mess I want to avoid cleaning up.


I picked up the rollers and the angle iron metal 'ears' that hold the front of the winch castings. Bushings for the rollers also came today.


We will see how far I get this weekend with the welding.
28 Jun 2016 12:56

5J Pony Motor Crankshaft Endplay

Category: DISCUSSION

do not block off oil holes, the pin is flanged, i carefully tried to capture the flange of the pin to the front and rear edge of reservoir, the other oil holes are right and left of the pin. some of the blocks i worked on appeared to be center punched in the area of the pin as to try to clinch the pin tight in its bore. to me this was done in the field because maybe the word was out about these pins coming out. to me there isn't enough or designed cast iron in the area to center punch clinch the pin tight. most recent case my welding machine pony retainer pin was kinda clustered f..... up. it had alot end play, the pin was out and the larger bore for the pin flange had been center punched to small causing the flange not to seat all the way down. its like they punched it small and then tried to install the pin. if it doesn't bottom out in the seat it ain't gonna stay. good luck

call if u want, i don't communicate well in writing.
28 Jun 2016 06:38

Cast iron and its welding

Category: DISCUSSION

You might wonder why we are into this topic – welding cast iron; but it is a versatile material which is used in manufacturing various industrial products with implications in our day to day life. With its excellent fluidity, low melting point, the extraordinary response to various designs of the machine etc, it has come to be known as an engineering material and is used in a range of applications such as machines, pipes, motor parts, gearbox and numerous other material for daily use. More here... www.weldingcastiron.org/cast-iron-and-its-welding/
21 Jun 2016 13:56

Procedures for welding cast iron

Category: DISCUSSION

my tips: pre heat with for excample oxy-acyt. tourch, use good welding rods like UTP8 for cast iron , weld short distances, hammer direct the weld after welding for relees of stresses caused by the heat. cool down slow the welded piece.

20 Jun 2016 07:10

Procedures for welding cast iron

Category: DISCUSSION

The process of welding cast iron has some special procedures. Since it is a challenging task, people can’t have two different opinions about the same. Unlike most other metals, cast iron has a greater content of carbon. This is the reason why cast iron is brittle which makes it really difficult to weld. If people follow some proper instructions, then the task of welding cast iron can be done at ease. Read more here, really very good article about procedures for welding cast iron… www.weldingcastiron.org/procedures-for-welding-cast-iron/
12 Apr 2016 10:37

D333C exhaust manifold leak

Category: DISCUSSION

Its a can of worms. I guess you are to the point where you want to open it, but just saying.......

If you are lucky, the manifold will slip off the studs with a little persuasion. Might need to heat the manifold around the studs to get it loose. If you cannot get it off, you might be able to blow the studs out of the hole in the cast iron enough to help some. They could be stainless studs?? If all else fails you, may be able to stick a hacksaw blade up between the manifold and the head and saw the stuck studs off. Once you get the manifold off you can surely press or drive the studs out of the manifold.

This brings you to the point of dealing with getting broken off studs out of the head. Fun! Fun! Fun!

Maybe it will be the exception to the rule and you won't break any studs getting the manifold off and they will be in good shape, so you won't want to replace them and break any off that way.

I got to do the same job on a 466 Deere in a combine last fall. I had one stud broken off to start with and ended up with 3 i think before it was over. On the combine I was really leery of making too many sparks and I didn't think I could blow them out of the blind holes in the head without damaging it and making things worse. Also was away from where I could get a welder to it to try welding on washers and nuts. So I ended up drilling them and attempted using screw extractors which got one. Had to drill and tap the remaining ones.

Good luck! Keep fire control in mind if you get out the torch and welder.
09 Apr 2016 22:05

D2 oil pan repair advice 5U13753

Category: DISCUSSION

I'd use the Electric rod for cast iron as OM says. V out the outside but not so much that the pieces don't fit together securely. Use a straight edge to be sure the machined surfaces remain aligned and clamp it tightly. I'm a big fan of preheating but others say cold welding is Ok. I'd get the big Barbie out and get it as hot as I could. Weld the outside surface first to hold the pieces together, then grind out a V channel along the crack line on the machined surface side and lay a bead filling the V groove. After welding, keep the Barbie going slowly reducing the heat. Some guys maintain burying the part in the earth to let it cool slowly but I find it not necessary. In the end you want a good gasket surface, so you'll need to do a nice job of grinding and filing the machined surface checking with a straight edge. Plenty of gasket sealer in that area going back together is advised.
(You might not need to get that crazy because you almost have enough gasket surface left where you might not need the pieces at all, but you'll be sick if it leaked oil there.)

So how did you drop it? Carrying it or trying to get it out from under the Cat? That thing weighs 105 lbs and is a real bear to get out when you are all alone out in the bush lying on your back under the tractor like I was this past summer, but I got it out, painted and back on during a field ring job.
09 Apr 2016 18:15

D2 oil pan repair advice 5U13753

Category: DISCUSSION

You could probably get away with either brazing or nickle cast iron arc rod welding for that repair. Some torch preheating required (spit test).
Not nearly as bad as trying to deal with a broken spring pad in the bottom of the pan.

I'd turn it over on its flange and c-clamp to a flat plate to get started. Yes the pieces will need to be v'd.
09 Mar 2016 04:39

Radiator Support Bracket Material

Category: DISCUSSION

if it's cast iron use nickle rods dunno what type of mig wire to use but with nickle rods you wont have to get to high tech make sure you have a bucket of dry sand handy pre heat a bit you can Vee it out if you want a lot depends on how thick the casting is once welded bury it in the sand and go have a cuppa or two

And pretty much the same for cast steel but its fairly hard to stuff up cast steel just like welding mild steel normal 12 P rods dunno if you blokes have them or not

As you probably gathered I dont have a Mig the old stick welder does all my stuff and with the new (5 or 6 years ago ) Lincoln Inverter welder I reckon I could weld ice lol

hope it is of some help if not disregard LOL and remember Im just a farmer not trained in any of this stuff just self taught so maybe disregard the lot LOL

Paul
09 Mar 2016 01:13

Radiator Support Bracket Material

Category: DISCUSSION

Hi, Ray.
Here is a link to a video on Youtube about spark testing ferrous metals:


Another Youtube video:


And a PDF on the same subject:

www.weldingwire.com/Images/Interior/docu...brary/metal%20id.pdf

And another:

www.wiete.com.au/journals/GJEE/Publish/vol15no3/05-Dalke-R.pdf

And some more detailed text:

www.tpub.com/steelworker1/6.htm

If the casting is cast steel, it would be relatively easy to weld a piece of mild steel to it - vee both pieces well back to about 40 - 45 degrees to give plenty of surface to weld to, clamp them in place, warm both pieces a little and weld. It is probably worth letting them cool out a little between passes so as to not cause too much heat stress in the cast steel. When you have completely welded it from one side, I'd suggest checking the weld on the other side to make sure that your first run went through and got both edges all the way. If it didn't get both edges, vee it out a little and fill it with weld.

If the casting is cast iron, I'll let the 'experts' tell you how to weld that.

Just my 0.02.
01 Dec 2015 04:51

Slow hydraulic lift on Cat D5B 98J

Category: DISCUSSION

You have two hydraulic systems, a high volume low pressure for the scraper and high pressure low volume for the tractor/blade, small leaks which allow the blade or scraper to drop overnight won't make much difference to operation. If the scraper rams are double the volume of the blade rams, their operating speed will be half the blade rams. If a ram is the same length and 1.5 times the diameter of another, its volume is getting close to double. We need more detail of ram dimensions for this question. Meanwhile, do a blocked cylinder test, hold the scraper up with a crane, disconnect the hydraulic lines, if they aren't quick couplers, the lines will need to be blanked off, then let the crane off. If the scraper still creeps down, you can forget any seal or spool leaks in the control valve, the fault is in the ram seals.


Guys

Attached some pictures that relate to a number of my posts on this topic plus a few others.

But first in response to a number of your suggestions I have determined that:
1. the scoop rams are not leaking as they hold when the tractor is running and turned off (I did as Catsilver suggested)
2. the blade rams are not leaking much as they hold when the tractor is running and turned off for several hours
3. swapping the blade and implement circuits made a small difference in the slow lift of the scoop such that it is now just usable particularly if I don't fully load it. The blade also lifts nearly as fast (acceptable) as it did before the swap. To get the scoop to lift I have to run the tractor at full revs while I can lift the blade at much lower revs.

So based on what you have told me it looks like I don't have a problem with blade or scoop rams nor the valve spools. That leaves pressure relief valve and pump performance does it not? I cant measure pump flow or pressure as I don't have the diagnostic equipment.
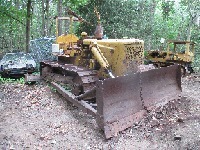
The photos

1. the scoop which shows the log stroke but fairly small bore rams and the half inch hoses which implies it should run on a modern high pressure system does it not?

2. 2 photos showing the broken cast iron ram retainer (gland packing ring) and my home made solution. I have a lathe so instead of paying $700 quoted for repair I turned up 2 pieces of mild steel, bored 4 holes for the bolts (not shown) and now have a working ram that doesn't leak a drop. I still need to turn a recess for a wiper seal when I get one.

3. my new stick rake still to be fitted by the manufacturer. Cost me $13000 which included delivery and fitting from a firm in Bundaberg which is about 7 hours driving from here.

4. my scrub canopy work in progress - using 75x50 RHS, a lot of welding rods and eventually to be sheeted with galvanised walkway expanded mesh that I got for free. Also to do a guard above the fuel tank to protect my back and a side guard on the right side down to the footplate. Note that this is not a true ROPS structure but is intended to protect me and the dozer from the smaller regrowth scrub I will be clearing. I wont put a tree pusher on so I won't be tempted to try pushing big trees down.

Ian
10 Sep 2015 07:46

Back working at the Cat 12 #6M17.

Category: DISCUSSION

Yes. Both exhaust manifolds are original and the center box as well. I had to do a little welding on the center box as it had a piece cracked out of one side around where the heat director turns. Contemplated making a new center box at first, but decided to just repair it as best I could and use it. It looks like the heat riser use to get water in it when it rained and that lead to freezing in the winter and rotting all year. Basically I cut all the rotten stuff out of the center and replaced it with 1 and 1/4th inch heavy walled pipe on the inside. It fit perfect. The outer heat riser part was the same size as 3 and 1/2 inch pipe. Used some flat plate to cover the open ends. Had to use Cast Iron welding rod on the original part of the intake. I made up a Stainless Steel plate and placed it between the heat box and lower heat riser to keep direct exhaust heat off of it. To say the least. This machine has had enough challenges to conquer. At least the hardest parts of its resurrection are behind it now. Dandy Dave!

Congratulations Dave, and thanks for the video. Your G-4600 engine is the only one that my ears have ever heard run, and good job on fixing up that manifold. The exhaust looks good though, still original?

29 Aug 2015 05:54

Brazing D2 radiator bottom tank

Category: DISCUSSION

Treath tape is teflon tape or a newer style (non toxic) tape ( or old style hemp cord wich works the best as i heard, because it expands when it becomes humid) a plumber uses to fith for example a water tap to avoid leaking. (it has no glu on it like isolating tape) its neccasery to turn in the treath with tape around it and not turning it backwards anymore as this can cause leakage.
to Jan Meermans: if you start a treath about welding manifolds i will add some pictures of manifolds i welded and some more tips for welding cast iron)
28 Aug 2015 21:38

Brazing D2 radiator bottom tank

Category: DISCUSSION

Neil,

I have been researching cast iron welding so I can weld with gas (or braze, silver solder?) my exhaust manifold on my TWENTY. I have spent some quality time viewing YOUTUBE with guys welding cast iron with gas, MIG and stick welding with CI specific rods. If I understand your problem, part of the hole (has split away from the rest so you can see the threads in there?) I would try this. Clean all surfaces with a wire wheel. Try to vee out where the weld will be made but leave a small section where the bolt will screw into the broken part un-veed so that the part goes back exactly where the threads are. I have no idea how much area you have to work with so maybe that is poor advice. It saves drilling it out and re-taping. You still would need to run your tap into the brazed area if the braze runs into the hole that far.

I think the pre-heating and post welding cool off in the grill is a good idea. If you stick weld you can peen it with a small hammer after you weld a bit to get rid of the stress. If you braze it, I'm not sure the stress builds up as bad so peening maybe not necessary especially if you cool it in the grill. (Bye the way, I like grilled D2 bottom tanks best when eaten with Dijon Mustard!)

Sorry, I'm no expert on this and still learning. Another option would be to take it to a professional welding shop and let them have a go of it.

Good luck with it and let us know how it came out. That's my 1.25 cents.

Jan
Displaying 31 - 45 out of 105 results.
Time to create page: 4.854 seconds
Go to top