- Posts: 6643
- Thank you received: 584

ACMOC Membership Benefits
- FREE quarterly magazine filled with content about antique Caterpillar machines
- FREE classified listings
- ACMOC store discounts and specials
- Full Bulletin Board Access
- Marketplace (For Sale/Wanted)
- Technical Library
- Post attachments
$44 /year ELECTRONIC
$60 /year USA
$77 /year International
- Forum
- Antique Caterpillar Machinery Owners Club
- DISCUSSION
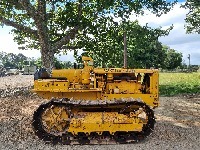
- Found a one owner 1950 D2 5U with 3940 original hours
Found a one owner 1950 D2 5U with 3940 original hours
1 year 4 months ago #243936
by neil
Cheers,
Neil
Pittsford, NY
Replied by neil on topic Found a one owner 1950 D2 5U with 3940 original hours
Can I ask why you want to remove that nut? Is there something that needs to be replaced? That nut is only there to connect the bevel gear and the shaft. The bearings can be removed without removing that nut. I replaced both of mine by slicing them with the gas axe. One could also possibly weld a fixture to the inner race to pull it off although that might tend to tighten the race on the shaft
Cheers,
Neil
Pittsford, NY
Please Log in or Create an account to join the conversation.
1 year 4 months ago #243943
by Markds3


Replied by Markds3 on topic Found a one owner 1950 D2 5U with 3940 original hours
The only reason is that it is the factory correct proceedure for removing the inner bearing races, as detailed on the following pages of the service manual. The RHS bearing race is hard up against the bevel gear hub and can't really be pulled from the shaft without having the hub removed from the shaft. However, If I can't back the nut off I might need to look at alternative ways of removing the inner bearing races.Can I ask why you want to remove that nut? Is there something that needs to be replaced? That nut is only there to connect the bevel gear and the shaft. The bearings can be removed without removing that nut. I replaced both of mine by slicing them with the gas axe. One could also possibly weld a fixture to the inner race to pull it off although that might tend to tighten the race on the shaft
Attachments:
Please Log in or Create an account to join the conversation.
1 year 4 months ago #243956
by neil
Cheers,
Neil
Pittsford, NY
Replied by neil on topic Found a one owner 1950 D2 5U with 3940 original hours
While that's true, it can be removed by slicing the race. That's what I did with both of them. It just takes care and covering up the various surfaces to protect them
Cheers,
Neil
Pittsford, NY
The following user(s) said Thank You: Markds3
Please Log in or Create an account to join the conversation.
- trainzkid88
-

- Offline
- Platinum Boarder
- Member
Less
More
- Posts: 2033
- Thank you received: 767
1 year 4 months ago - 1 year 4 months ago #243961
by trainzkid88
Replied by trainzkid88 on topic Found a one owner 1950 D2 5U with 3940 original hours
a dremel with a abrsive disc will also cut it and easier to control. of course this will destroy the bearing you may not need to cut it all the way through a relief cut opposite each other and a hammer and cold chisel will break it as they are hard steel and thus brittle.
with the cage gone you might be able to get a bearing knife(seperator) behind that bearing it possible its on the shaft so neat that it wont let the nut move.
if i understand the book you start pulling and undo the nut as you pull.
with the cage gone you might be able to get a bearing knife(seperator) behind that bearing it possible its on the shaft so neat that it wont let the nut move.
if i understand the book you start pulling and undo the nut as you pull.
Last edit: 1 year 4 months ago by trainzkid88.
The following user(s) said Thank You: Markds3
Please Log in or Create an account to join the conversation.
1 year 4 months ago #243964
by Sasquatch
Replied by Sasquatch on topic Found a one owner 1950 D2 5U with 3940 original hours
I agree with Neil's advice, at this point I would try splitting the inner race and it'll slide right off. First cut the roller cage so that you can open it up and pull enough rollers out to allow you to disengage the cage and remaining rollers from the inner race - then pack the surrounding area with rags to keep all grinding grit from entering the oil compartment and/or sticking to everything that has oil on it and (without cutting so deep that you nick the shaft) take a thin cutoff wheel on a die grinder or other small device and slit the race most of the way through on a diagonal line. When you're deep enough, you can take a chisel and drive the tapered point into the slit, which will cause the race to crack, completely loosening its fit on the shaft. Use all of the appropriate protection when striking the hardened race, as they often shed small razor sharp bits off when they're struck like that. Here's a video of the race splitting process in action, did this countless times myself over the years -
Please Log in or Create an account to join the conversation.
1 year 4 months ago #243966
by Markds3
Replied by Markds3 on topic Found a one owner 1950 D2 5U with 3940 original hours
Thanks Toby, Neil and every one else for your replies. Much appreciate your help. Have a Merry Christmas and I'll report back here with my progress as soon as I can.
The following user(s) said Thank You: kracked1
Please Log in or Create an account to join the conversation.
1 year 4 months ago - 1 year 4 months ago #243981
by Markds3
Replied by Markds3 on topic Found a one owner 1950 D2 5U with 3940 original hours
Success finally! Firstly I unlocked and unbolted the bevel gear from the hub and in doing so was able to move the shaft hard left and therefore try a pluller on the LHS bearing, the bearing was still too tight and the cage gave way:


I then packed rags carefully around the race and using a dremel cut-off wheel on my dire grinder was able cut slits in the inner races as described in Tobys post above. What a job! Those old Timkens are very tough, I basically had to go right through the races before they would crack with the cold chisel, and this took ages becuse I didn't want to nick the shaft and there were two sides to do!:

I'm not regretting my decision to replace the bearings!

and by 10.30 tonight I had the bevel gear bolted back to the hub, the 1/2" UNF nuts torqued to 85ftlb and re-locked.

I then packed rags carefully around the race and using a dremel cut-off wheel on my dire grinder was able cut slits in the inner races as described in Tobys post above. What a job! Those old Timkens are very tough, I basically had to go right through the races before they would crack with the cold chisel, and this took ages becuse I didn't want to nick the shaft and there were two sides to do!:
I'm not regretting my decision to replace the bearings!
and by 10.30 tonight I had the bevel gear bolted back to the hub, the 1/2" UNF nuts torqued to 85ftlb and re-locked.
Attachments:
Last edit: 1 year 4 months ago by Markds3.
Please Log in or Create an account to join the conversation.
- trainzkid88
-
- Offline
- Platinum Boarder
- Member
Less
More
- Posts: 2033
- Thank you received: 767
1 year 4 months ago #243982
by trainzkid88
Replied by trainzkid88 on topic Found a one owner 1950 D2 5U with 3940 original hours
yes they were knackered. once corrosion starts it keeps going.
Please Log in or Create an account to join the conversation.
1 year 4 months ago #243987
by neil
Cheers,
Neil
Pittsford, NY
Replied by neil on topic Found a one owner 1950 D2 5U with 3940 original hours
Very nice, great job Mark. My modus operandus is to always replace bearings if I have them exposed, unless I know that they're good. The reason is that bearings are usually available and compared with the often-rare parts for these older machines, cheap. As we can see with those races, you didn't regret getting to those two bearings : )
Cheers,
Neil
Pittsford, NY
Please Log in or Create an account to join the conversation.
1 year 4 months ago #244001
by Markds3
Replied by Markds3 on topic Found a one owner 1950 D2 5U with 3940 original hours
I extracted the steering clutch pivot pins and 'cranks' this morning and I'm really pleased to see everything is in exceptional condition.


however the RHS does have a broken 5B2121 buffer spring which I'll need to find.

however the RHS does have a broken 5B2121 buffer spring which I'll need to find.
Attachments:
The following user(s) said Thank You: gauntjoh
Please Log in or Create an account to join the conversation.
- Forum
- Antique Caterpillar Machinery Owners Club
- DISCUSSION
- Found a one owner 1950 D2 5U with 3940 original hours
Time to create page: 0.440 seconds
ACMOC
Antique Caterpillar Machinery Owners Club
1115 Madison St NE # 1117
Salem, OR 97301
cat@acmoc.org
Become a Member!
"I became a member recently because the wealth of knowledge here is priceless."
- Chris R
"I also joined a year ago. had been on here a couple of times as a non-member and found the info very helpful so I got a one year subscription (not very expensive at all) to try it out. I really like all the resources on here so I just got a three year. I think its a very small price for what you can get out of this site."
- Jason N