
- Posts: 633
- Thank you received: 109

ACMOC Membership Benefits
- FREE quarterly magazine filled with content about antique Caterpillar machines
- FREE classified listings
- ACMOC store discounts and specials
- Full Bulletin Board Access
- Marketplace (For Sale/Wanted)
- Technical Library
- Post attachments
$44 /year ELECTRONIC
$60 /year USA
$77 /year International
- Forum
- Antique Caterpillar Machinery Owners Club
- DISCUSSION
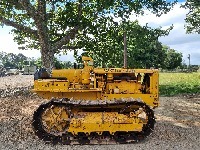
- Found a one owner 1950 D2 5U with 3940 original hours
Found a one owner 1950 D2 5U with 3940 original hours
1 year 4 months ago #244200
by PhilC
944A - Machine SN 43A2589 Engine SN 90A284
955K- Machine SN 71J3772 Engine SN 83Z0704
D6 SN's 4R732sp, 5R2724, 5R4832
D8 SN's 15A1254, 15A2287, 15A2723
Replied by PhilC on topic Found a one owner 1950 D2 5U with 3940 original hours
Sorry I should have stated why I thought the contact pattern was not right. If you look at both pictures it appears that there is only about 30 percent contact at the tip. Looking at the Cat manuals for D8, 955K, D6, 944 and the one posted by Toby it shows the contact pattern starts a small distance from the toe and continues to about fifty percent of the tooth.It also states that in the information above the image.
944A - Machine SN 43A2589 Engine SN 90A284
955K- Machine SN 71J3772 Engine SN 83Z0704
D6 SN's 4R732sp, 5R2724, 5R4832
D8 SN's 15A1254, 15A2287, 15A2723
The following user(s) said Thank You: Markds3
Please Log in or Create an account to join the conversation.
1 year 4 months ago #244203
by Markds3

Replied by Markds3 on topic Found a one owner 1950 D2 5U with 3940 original hours
Thanks Phil, I did another test of the contact pattern tonight, without as much paint and with less tension on the bevel gear. Pic below, to me it starts just short of the toe and travels almost 50% of the tooth.Sorry I should have stated why I thought the contact pattern was not right. If you look at both pictures it appears that there is only about 30 percent contact at the tip. Looking at the Cat manuals for D8, 955K, D6, 944 and the one posted by Toby it shows the contact pattern starts a small distance from the toe and continues to about fifty percent of the tooth.It also states that in the information above the image.
Attachments:
Please Log in or Create an account to join the conversation.
1 year 4 months ago - 1 year 4 months ago #244204
by Markds3
Replied by Markds3 on topic Found a one owner 1950 D2 5U with 3940 original hours
Today I had to spend considerable time lapping the back of the locknuts for the steering clutch thrust bearings as I couldn't tighten them down enough to get the locking threads to line up, I got there eventually!


Attachments:
Last edit: 1 year 4 months ago by Markds3.
The following user(s) said Thank You: gauntjoh
Please Log in or Create an account to join the conversation.

1 year 4 months ago #244217
by Sasquatch
Replied by Sasquatch on topic Found a one owner 1950 D2 5U with 3940 original hours
The 1/2" x 20 studs/nuts on the bevel bearing caps should be good to around 60 ft.lb. so I'd say torque to 50-ish and then have the ability to advance the nut a little bit for better lock tab alignment, if necessary. Most fasteners that size I usually just tighten by feel because I've done it so many times. Regarding checking the contact patterns on these worn-in gear sets, always remember that the working range of each tooth surface has likely lost a little bit of its original profile, so the toe contact in the non-loaded state will likely drop off quicker as it moves on up the tooth face. You just gotta trust the process in that when loaded, you'll reasonably be replicating what the established contact pattern actually is. The truck differentials I rebuilt for years at the dealership were a lot more straight-forward to contact pattern check, as both the pinion and ring gear were held on a fixed axis by preloaded taper bearings and didn't move around much under load - with those, the pattern you saw when you tested was the same pattern you had when it was operating.
The following user(s) said Thank You: Markds3
Please Log in or Create an account to join the conversation.
1 year 4 months ago #244394
by Markds3
Replied by Markds3 on topic Found a one owner 1950 D2 5U with 3940 original hours
I've been traveling this last week, and my travels took me to the same region of a old ex CAT mechanic who deals in secondhand parts. He had the necessary steering clutch lever spring which he gave me for free!

Attachments:
Please Log in or Create an account to join the conversation.
1 year 4 months ago #244395
by Markds3
Replied by Markds3 on topic Found a one owner 1950 D2 5U with 3940 original hours
Yesterday I started assembling the steering clutches with the new Bimetallic frictions:


Attachments:
Please Log in or Create an account to join the conversation.
1 year 4 months ago #244396
by PhilC
944A - Machine SN 43A2589 Engine SN 90A284
955K- Machine SN 71J3772 Engine SN 83Z0704
D6 SN's 4R732sp, 5R2724, 5R4832
D8 SN's 15A1254, 15A2287, 15A2723
Replied by PhilC on topic Found a one owner 1950 D2 5U with 3940 original hours
I usually drop the drum over the outer splines to make sure they are all aligned properly before clamping up the springs. Nothing worse than trying to fit it with one plate slightly out of alignment.
944A - Machine SN 43A2589 Engine SN 90A284
955K- Machine SN 71J3772 Engine SN 83Z0704
D6 SN's 4R732sp, 5R2724, 5R4832
D8 SN's 15A1254, 15A2287, 15A2723
The following user(s) said Thank You: Markds3
Please Log in or Create an account to join the conversation.
1 year 4 months ago #244399
by Markds3
Replied by Markds3 on topic Found a one owner 1950 D2 5U with 3940 original hours
Thanks Phil, and that's exactly what I did.PhilC post=244396 userid=11059
Please Log in or Create an account to join the conversation.
1 year 4 months ago #244420
by Markds3
Replied by Markds3 on topic Found a one owner 1950 D2 5U with 3940 original hours
Another day and some great progress. I got the bevel gear shaft caps all torqued down and the locks all in place:


And I got the steering clutch linkages levers and yokes all in place:

And I got the steering clutch linkages levers and yokes all in place:
Attachments:
The following user(s) said Thank You: gauntjoh
Please Log in or Create an account to join the conversation.
1 year 4 months ago #244421
by Markds3
Replied by Markds3 on topic Found a one owner 1950 D2 5U with 3940 original hours
Next I installed the steering clutch packs and pressed them on to the splined tapers to 9 tons (the ram is rated to 20tons at 10000psi)


I was pleased to see the end of the shaft was still recessed:

I was pleased to see the end of the shaft was still recessed:
Attachments:
The following user(s) said Thank You: gauntjoh
Please Log in or Create an account to join the conversation.
- Forum
- Antique Caterpillar Machinery Owners Club
- DISCUSSION
- Found a one owner 1950 D2 5U with 3940 original hours
Time to create page: 0.442 seconds
ACMOC
Antique Caterpillar Machinery Owners Club
1115 Madison St NE # 1117
Salem, OR 97301
cat@acmoc.org
Become a Member!
"I became a member recently because the wealth of knowledge here is priceless."
- Chris R
"I also joined a year ago. had been on here a couple of times as a non-member and found the info very helpful so I got a one year subscription (not very expensive at all) to try it out. I really like all the resources on here so I just got a three year. I think its a very small price for what you can get out of this site."
- Jason N