- Posts: 1235
- Thank you received: 108

ACMOC Membership Benefits
- FREE quarterly magazine filled with content about antique Caterpillar machines
- FREE classified listings
- ACMOC store discounts and specials
- Full Bulletin Board Access
- Marketplace (For Sale/Wanted)
- Technical Library
- Post attachments
$44 /year ELECTRONIC
$60 /year USA
$77 /year International
- Forum
- Antique Caterpillar Machinery Owners Club
- DISCUSSION
- Found a one owner 1950 D2 5U with 3940 original hours
Found a one owner 1950 D2 5U with 3940 original hours
1 year 4 months ago #244484
by Sasquatch
Replied by Sasquatch on topic Found a one owner 1950 D2 5U with 3940 original hours
Excellent progress! You’re quickly coming down to the finish line of one of the worst jobs a person could have to do to a Cat D2 - my own personal least favorite job now is turning the pins and bushings - although doing bevel shaft bearings is only one notch above it lol 😂 The first drive will be well worth it though, when all the levers are adjusted well and you feel how smooth the clutches operate with everything in the back end being tight and right 👍
Please Log in or Create an account to join the conversation.
1 year 4 months ago - 1 year 4 months ago #244488
by Markds3
And, to be honest, doing these bevel shaft bearings has taken much much more time and been far more difficult than I ever expected!
Replied by Markds3 on topic Found a one owner 1950 D2 5U with 3940 original hours
Thanks Toby, I certainly appreciate your contributions and detailed help/knowledge. It's safe to say that your videos have inspired me, and I wouldn't have this little tractor nor would have undertaken this work with out them, so thank you!Excellent progress! You’re quickly coming down to the finish line of one of the worst jobs a person could have to do to a Cat D2 - my own personal least favorite job now is turning the pins and bushings - although doing bevel shaft bearings is only one notch above it lol 😂 The first drive will be well worth it though, when all the levers are adjusted well and you feel how smooth the clutches operate with everything in the back end being tight and right 👍
And, to be honest, doing these bevel shaft bearings has taken much much more time and been far more difficult than I ever expected!
Last edit: 1 year 4 months ago by Markds3.
The following user(s) said Thank You: gauntjoh
Please Log in or Create an account to join the conversation.
1 year 4 months ago - 1 year 4 months ago #244489
by Markds3
Replied by Markds3 on topic Found a one owner 1950 D2 5U with 3940 original hours
Today I got the seat and tank cleaned, lifted up and bolted in place:


I got the foot plates in place, fuel tank connected and the brakes adjusted:


And finally I got the pony running, fuel system bled and the main engine running!
I got the foot plates in place, fuel tank connected and the brakes adjusted:
And finally I got the pony running, fuel system bled and the main engine running!
Attachments:
Last edit: 1 year 4 months ago by Markds3.
Please Log in or Create an account to join the conversation.
1 year 4 months ago #244493
by Rome K/G
Replied by Rome K/G on topic Found a one owner 1950 D2 5U with 3940 original hours
Good to note and put in the archive's photos of those decals for correct placement on collector's tractors. Those are correctly placed on the machine from the factory.
The following user(s) said Thank You: Markds3
Please Log in or Create an account to join the conversation.
- Kurt Bangert
-
- Offline
- Administrator
- Member
Less
More
- Posts: 474
- Thank you received: 470
1 year 4 months ago #244498
by Kurt Bangert
D4 D 78A 6678
D4 6U 1139
RD4 4G223W
D2 5U 1164
JD 350B
JD 420C
Replied by Kurt Bangert on topic Found a one owner 1950 D2 5U with 3940 original hours
Mark, what are you using to clean the tractor as you go? The paint is exceptional.
D4 D 78A 6678
D4 6U 1139
RD4 4G223W
D2 5U 1164
JD 350B
JD 420C
The following user(s) said Thank You: Markds3
Please Log in or Create an account to join the conversation.
1 year 4 months ago - 1 year 4 months ago #244519
by Markds3
Replied by Markds3 on topic Found a one owner 1950 D2 5U with 3940 original hours
Hello Kurt, nothing special, just a box store engine degreaser where there is oil/grease present. I'm going to give the whole tractor a wash with a car wash/wax to add some shine back once I'm finished. And you're right the paint is exceptionally good, very interesting to see the factory finish (which isn't that good in many areas!) quite a few runs and 'dry' bits where coverage isn't very good.Mark, what are you using to clean the tractor as you go? The paint is exceptional.
Last edit: 1 year 4 months ago by Markds3.
Please Log in or Create an account to join the conversation.
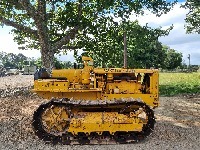
1 year 4 months ago - 1 year 4 months ago #244520
by Markds3
Replied by Markds3 on topic Found a one owner 1950 D2 5U with 3940 original hours
Today I hoped to have the tractor finished, but simply ran out of time as so often happens.
Started off cleaning the track frames, which I must say are in exceptionally good condition. There were several pounds of caked on grease/dirt mixture around each of the rollers and scraping it off the best I could took lots of time!


I then installed new pivot shaft seals with the lip facing outwards, as per the service manual:

Lifted the track frames in place:

And fitted the shims and retaining thrust washers with new fold over locks:

Started off cleaning the track frames, which I must say are in exceptionally good condition. There were several pounds of caked on grease/dirt mixture around each of the rollers and scraping it off the best I could took lots of time!
I then installed new pivot shaft seals with the lip facing outwards, as per the service manual:
Lifted the track frames in place:
And fitted the shims and retaining thrust washers with new fold over locks:
Attachments:
Last edit: 1 year 4 months ago by Markds3.
Please Log in or Create an account to join the conversation.
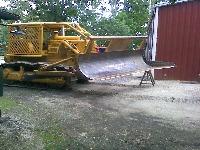
1 year 4 months ago #244521
by Markds3
Replied by Markds3 on topic Found a one owner 1950 D2 5U with 3940 original hours
I then started cleaning the rear rollers (which were removed to take the track frames off). While the bushes and shafts were in exceptionally good condition, three of the four bellows seals had split apart at the bellows. This also made it a real bear of a job to reassemble the caps back on the rollers without everything falling apart and I had to wire the caps to the rollers to hold everything in pace while installing them on the track frames. It looks like a project for next Christmas holidays will be to install new seals on all of the rollers!

Last of all I got the LH track looped over (all by hand, which is heavy work!) and the master pin hammered in place:


Last of all I got the LH track looped over (all by hand, which is heavy work!) and the master pin hammered in place:
Attachments:
Please Log in or Create an account to join the conversation.

1 year 4 months ago #244524
by neil
Cheers,
Neil
Pittsford, NY
Replied by neil on topic Found a one owner 1950 D2 5U with 3940 original hours
Looks good Mark. I have to say that it really helps when you start out with a unit that's already in great condition. You have a bit of a unicorn there and I'd say in your care it will stay that way - good job!
Cheers,
Neil
Pittsford, NY
The following user(s) said Thank You: Markds3
Please Log in or Create an account to join the conversation.
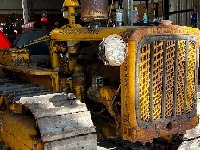
1 year 4 months ago - 1 year 4 months ago #244548
by Markds3
Replied by Markds3 on topic Found a one owner 1950 D2 5U with 3940 original hours
Finally, after a long day of work I got her finished!
First thing this morning I got the tin work all clean:

And I noticed this silver paint brushed around the the underside of the exhaust opening, I can only presume it was from the silver paint brushed on the manifold from factory!

Tractor off blocks and tracks adjusted:

Just under 1 1/2" of thread clear on the adjusting screws with the tracks adjusted correctly!

Lifting the drawbar in place with a new ACMOC wear shoe:

First thing this morning I got the tin work all clean:
And I noticed this silver paint brushed around the the underside of the exhaust opening, I can only presume it was from the silver paint brushed on the manifold from factory!
Tractor off blocks and tracks adjusted:
Just under 1 1/2" of thread clear on the adjusting screws with the tracks adjusted correctly!
Lifting the drawbar in place with a new ACMOC wear shoe:
Attachments:
Last edit: 1 year 4 months ago by Markds3.
Please Log in or Create an account to join the conversation.
- Forum
- Antique Caterpillar Machinery Owners Club
- DISCUSSION
- Found a one owner 1950 D2 5U with 3940 original hours
Time to create page: 0.429 seconds
ACMOC
Antique Caterpillar Machinery Owners Club
1115 Madison St NE # 1117
Salem, OR 97301
cat@acmoc.org
Become a Member!
"I became a member recently because the wealth of knowledge here is priceless."
- Chris R
"I also joined a year ago. had been on here a couple of times as a non-member and found the info very helpful so I got a one year subscription (not very expensive at all) to try it out. I really like all the resources on here so I just got a three year. I think its a very small price for what you can get out of this site."
- Jason N